How to install LED light strips, how to install LED light strips
Customers often ask, how to install LED light strips/light strips? Because LED light strips are a new product launched in recent years, many customers do not know much about how to install LED light strips. Next, let’s discuss the installation method of LED light strips.
When installing LED light strips, you should consider the following issues: waterproof level, total power, power supply, controller, etc.
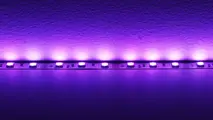
Let’s first introduce the LED light strips: LED light strips emit pure colors, brilliant colors, high brightness, energy saving and environmental protection, long life, safety and reliability, and are generally used in the decoration industry.
When LED light strips are used for interior decoration, they do not have high requirements for waterproofing and UV protection, and the installation is relatively simple.
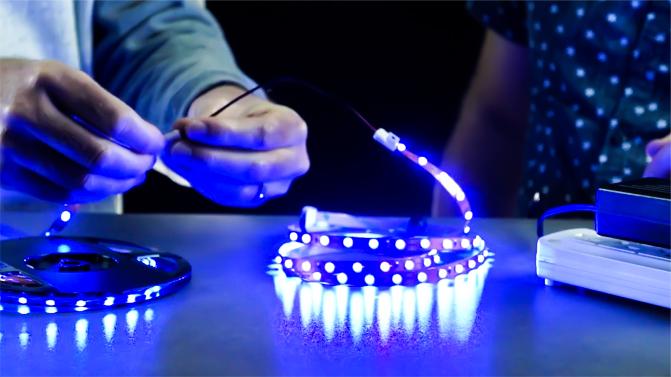
1. Tear off the 3M glue. Each LED flexible light strip has self-adhesive 3M double-sided tape on the back. During installation, you can directly peel off the sticker on the surface of the 3M double-sided tape, then fix the LED light strip in the installation position and just stick it tightly with your hands. .
2. Cut the LED light strip to any length. As for some places where you need to turn or the length of the LED light strips is inconsistent. The LED light bar is a circuit structure composed of 3 LEDs in series and parallel. Every 3 LEDs can be cut off. If they are too long, they can be cut off. If they are too short, they can be welded on.
3. Fixing of LED light strips. When outdoors, it will be corroded by rain and ultraviolet rays. If 3M glue is used to fix it, the 3M glue will reduce its adhesiveness over time and cause the LED light strip to fall off. Therefore, outdoor LED flexible light strips are often installed using card slots. . Where cutting and connection are required, the method is the same as for indoor installation, except that additional waterproof glue is required to consolidate the waterproof effect of the connection points.
4. LED flexible light strip matching power supply. The general voltage of LED light strips is DC 12V, so a switching power supply is required. The size of the power supply is calculated based on the power and length of the LED light strip. You can also purchase a high-power switching power supply as the main power supply, connect all the input power supplies of the LED flexible light strips in parallel (if the wire size is not enough, you can extend it separately), and the main switching power supply is uniformly powered. The advantage of this is that it can be controlled centrally. The inconvenience is that it cannot realize the lighting effect and switch control of a single LED light strip. The specific method can be measured by yourself.
5. How to choose the controller of LED light strip? If it is LED horse racing strip and RGB strip, then you need to use a controller to achieve the color changing effect. Monochrome ones do not need a controller. The control distance of each controller is different. Generally speaking, the control distance of a simple controller is 10 to 15 meters, and the control distance of a remote controller is 15 to 20 meters. The longest distance can be controlled to 30 meters.
6. LED light strips use amplifiers. If the connection distance of the LED light strip is long and the controller cannot control such a long light strip, then a power amplifier is needed for tapping.
Regarding the connection distance of LED light strips. The maximum connection distance of the 3528 SMD series LED light bar is 20 meters, and the maximum connection distance of the 5050 SMD series LED light bar is 15 meters. If this connection distance is exceeded, the LED light strip will easily generate heat, which will affect the service life of the LED light strip during use. Therefore, the installation must be carried out in accordance with the manufacturer's requirements, and the LED light strip must not be overloaded.
Classification of led light strips
LED light strips are generally divided into flexible LED light strips and LED hard light strips, but they also generally include old-fashioned light strips that use wires to connect LEDs, such as flat three-wire 4.3W/meter, flat four-wire 6.48W/meter, and flat five-wire 8.64W/meter light strip, etc.
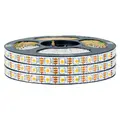
1. The flexible LED light strip uses FPC as the assembled circuit board and SMD LEDs for assembly, so that the thickness of the product is only the thickness of a coin and does not take up space; the common specifications are 30cm long with 18 LEDs, 24 LEDs, and 50cm long 15 LEDs, 24 LEDs, 30 LEDs, etc. There are also 60cm, 80cm, etc. Different users have different specifications. And it can be cut or extended at will without affecting the brightness. The FPC material is soft and can be bent, folded, rolled, and moved and expanded in three-dimensional space without breaking. It is suitable for use in irregular places and places with small spaces, and because it can be bent and rolled arbitrarily, it is suitable for any combination of various patterns in advertising decoration.
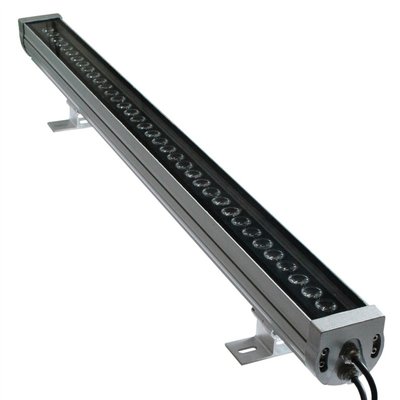
2. LED hard light strips are assembled with PCB hard boards as circuit boards. LEDs can be assembled with SMD LEDs or with in-line LEDs. Different components are used depending on the needs. The advantage of hard light strips is that they are easier to fix and are more convenient to process and install; the disadvantage is that they cannot be bent at will and are not suitable for irregular places. Hard light strips use SMD LEDs with 18 LEDs, 24 LEDs, 30 LEDs, 36 LEDs, 40 LEDs, etc.; those with direct plug-in LEDs include 18 LEDs, 24 LEDs, 36 LEDs, and 48 LEDs. There are different specifications, including front and side ones. The ones that emit light from the side are also called Great Wall light bars.
Characteristics of LED light strips
1. Soft and can be curled at will.
2. Can be cut and extended. 3. The light bulb and passage are completely covered in flexible plastic, with good insulation and waterproof properties, and are safe to use.
4. Strong weather resistance.
5. Not easy to break and have long service life.
6. Easy to create graphics, text and other shapes; it has been widely used in buildings, bridges, roads, gardens, courtyards, floors, ceilings, furniture, buses, lakes, underwater, posters, pink signs, signs, etc. Whitewash and illuminate.
LED light strip installation environment
When LED light strips are used outdoors, they will be corroded by rain and ultraviolet rays. If 3M glue is used to fix them, the 3M adhesive will decrease over time and cause the LED light strips to fall off. Therefore, outdoor LED flexible light strips are often installed using The way the card slot is fixed. Where cutting and connection are required, the method is the same as for indoor installation, except that additional waterproof glue is required to consolidate the waterproof effect of the connection points.
LED light strip installation and wiring diagram
(1) The first light strip wiring method: (welding method)
The first step is to determine whether the installed light strip/LED light strip uses high-voltage electricity or low-voltage electricity (considering the safety of electricity, it is best to choose a low-voltage electrically activated light strip). After selecting a low-voltage LED light strip, you need to First, observe that there are two dots for every three lamp beads on the lamp strip. Just solder the wire to the dots. However, some children's shoes will use high-voltage light strips considering brightness and illumination. If they are high-voltage, use pins to plug them in and connect the plug to the household power supply of 220 volts.
(2) The second light strip wiring method: (terminal wiring method)
First, all the lamp beads are mixed and connected in series with a number of resistors. This is a lamp strip that requires 12V DC power supply. Directly connect the two output lines of the 12V DC power supply (either regulated or unregulated) to the positive and negative sides of the lamp strip. Just plug the power plug into the household AC power socket on the negative terminal, or you can use a 12V battery pack to directly drive this kind of light strip.
(3) The third light strip wiring method: (driver connection method)
First of all, a light strip with all lamp beads connected in series needs to be equipped with a capacitor-ballasted constant current driver (there is also a better switch-type constant current driver, suitable for driving low-voltage light strips). Insert the two pins of the driver plug into the cores of the two leads of the light strip according to the correct polarity, and then plug the driver power plug into a household 220-volt AC power socket.
5 major methods for installing LED light strips
① The four-wire LED light strip has four wires in total, three rows of lights (note that it is not four rows of lights~~), each row is 1 meter and has 24 lights, 24*3=72. Since the power of each lamp bead is 0.05W, the power of the 72-bead LED light strip is: 72*0.05=3.6W.
②The width of the four-wire LED lamp is about 22mm, the thickness is about 8mm, and the weight is about 0.25kg/m (4 meters per kilogram)
③Each LED light strip must be equipped with a special plug (plug with transformer); when connecting, the transparent plastic cover must be removed, and the test light must be connected before covering it. Do not connect directly with the cover, as this may lead to short circuit!
④ There is a "scissor" mark on each meter. You can only cut it after the mark. If you cut it wrongly or off-center, the meter will not light up! Some may be slightly off when marking. It is best to read the mark carefully before cutting. At the right position, just cut it according to the unconnected place in the middle. You can see it if you look carefully.
⑤ When installing LED light strips, they are usually placed in the light trough and can be straightened. They can also be fixed with thin ropes or thin iron wires. If you need to install it externally or vertically, you need to purchase separate clips and tail plugs. The original clip is fully transparent. It is best to put waterproof glass glue on the tail plug and plug after installation, so that the waterproof performance is better.
Precautions when installing LED light strips
① Do not turn on the power to light up the LED light strips before the entire roll of LED light strips is removed from the packaging or piled up;
② When the LED light strip needs to be cut according to the length of the on-site installation, the light strip can only be cut at the place marked with scissors, otherwise one of the units will not light up. Generally, the length of each unit is 1.5-2 meters;
③When connecting the power supply or connecting two light strips in series, first bend the head of the Licai lamp to the left and right so that about 2-3mm of the wires in the light strip are exposed. Use scissors to cut them cleanly without leaving burrs, and then use a male needle to connect them. , to avoid short circuit;
④Only LED colorful light strips with the same specifications and the same voltage can be connected in series, and the total length of the series connection cannot exceed the maximum allowable length;
⑤When LED light strips are connected in series, try to light one section after each connection, so as to promptly find out whether the positive and negative poles are connected incorrectly and whether the light emission direction of each section of light strips is consistent;
⑥The end of the light strip must be put on a PVC tail plug, and then tied tightly with a clamp tape, and then sealed around the interface with neutral glass glue to ensure safety.
⑦ Because LED has unidirectional conductivity, if you use a power cord with an AC-DC converter, you should first conduct a power test after completing the power connection to make sure that the positive and negative poles are connected correctly before putting it into use.